Guest posting wearing you out?
Are you out of ideas to write about?
Do you have writer’s block?
What about the opposite…
Do you feel overwhelmed with the amount of writing you need to do?
We’ve all been there. At both ends of the spectrum.
Then Adam tells us to guest post on other blogs too.
Yes, more writing.
Wait. It doesn’t have to be that bad.
Below are 7 apps to help streamline your guest posting. Some will even help your blog.
With the tools below, you’ll be able to quickly write and format your post for any site that accepts it.
Ready to become a guest posting machine? Then keep reading.
Stop Slogging Through Your Writing
1. iA Writer
Focusing on writing is tough, especially for travel bloggers.
You probably don’t have a cushy, climate-controlled office to work from. You’re lucky if you have a flat surface.
Plus, you’re constantly tempted by the allure of your current “home.” How can you have an experience worth writing about if all you’re doing is writing?
Getting distracted is easy if you’re writing in your browser in WordPress or Google Docs.
iA Writer is a great writing app because it has one killer feature: a full screen, focused writing environment.
With iA Writer, it’s just you and a blank screen. While that may sound daunting, at least you won’t be distracted.
iA Writer even supports Markdown for easily formatting your posts without writing clunky HTML. Just making this switch was a massive time saver for me.
WriteRoom is another popular choice.
You can find iA Writer ($4.99) and WriteRoom ($4.99) in the Mac App Store. Or try Leo Babauta’s list of free minimalist word processors on GigaOm.
2. Evernote

Clip any webpage with Evernote
Writing a post that requires research, screenshots, or lots of links? Track it all in Evernote.
Evernote remembers everything so you don’t have to.
Using their bookmarklet, you can save any image, article, or webpage then tag and categorize it for easy recall later.
Writing a list post like 37 Travel Publishers Who Pay requires extensive research.
As soon as you think of a post idea that you can’t write from memory, create a new notebook (or tag) in Evernote. Then whenever you come across a great example to include, bookmark it for later reference.
Once you have enough examples, you can open them up and write your post. All of the links you need will be at your fingertips.
Avoid the Stock Photography Trap

Annotate screenshots with Skitch (via Lifehacker)
3. Skitch
Instructional posts (like this one) need screenshots. If you’re writing a “how to” post, use Skitch (now part of Evernote) for your screenshots.
Skitch provides more functionality than native screen capture tools.
Using keyboard shortcuts, you can take any type of screenshot (crosshair, fullscreen, frame). Then you can edit the image and add simple shapes or text to illustrate your point.
Finally, you can save your screenshot or send it directly to Evernote for later use.
4. Pixlr
Even if you’re not using screenshots, most posts still need images.
Pixlr is a lightweight, web-based Photoshop alternative. If, like me, you’re not much of a designer, it’s a lifesaver. You can use Pixlr to crop pictures, add text, or resize images to fit your target blog’s width (more on this later).
You can even use Pixlr-o-matic to add Instagram-like filters to your images along with borders and other effects. A few tweaks can take a stock photograph from stark white cliche to eye-catching image.
Pitch More, Get Rejected Less

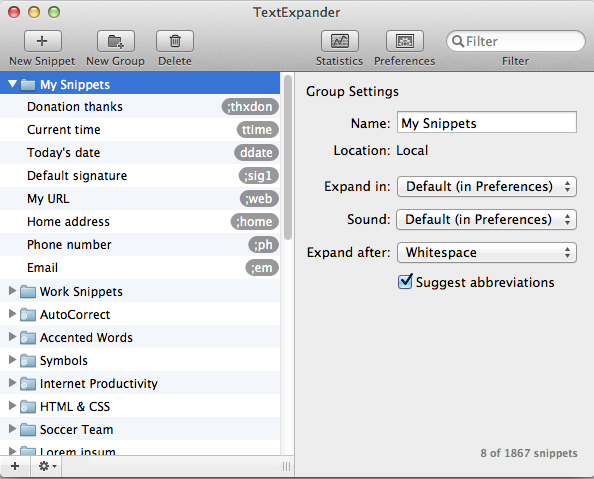
Create keyboard shortcuts for email pitches with TextExpander
5. Text Expander
When you’re pitching your guest posts to bloggers, you’ll be writing a lot of similar emails.
Similar, not the exact same.
Using a template is fine if you customize every pitch. Mention what you like about that specific blog or how your post would complement other content on the site.
You could speed up this process by copying and pasting a template email from Microsoft Word or TextEdit, but you can do it even more efficiently with an app designed just for this purpose.
TextExpander is the most popular typing shortcut app. It’s like copy and paste on steroids.
You can create custom keyboard shortcuts to trigger blocks of text like a prewritten email form. Paste whatever you want (without copying it first) by typing a keyboard shortcut.
While it works great, TextExpander is a bit pricy at $34.95.
However, you can use it for a lot more than just guest post pitches.
You can create canned responses to common questions and requests you get on your blog. Your email, address, or anything you type often can be replaced with a few easy-to-remember keystrokes.
Canned Response is a free alternative, although it only works in Gmail.
6. Boomerang

Create follow-up reminders in Gmail
You wrote the pitch and it’s ready to go. One more thing before you press the send button…
Even the bloggers who do accept your posts won’t necessarily do so promptly. Or after your first email.
They’re busy people. That’s why they have successful blogs that you want a link from.
You can use a Google spreadsheet to track your correspondence with each blogger. I usually include the date that I contacted him/her and if I got a response.
Instead of checking the spreadsheet every day to see whom you need to follow up with or whom you’re waiting to hear back from, use the Boomerang Gmail extension to automate your reminders.
When you send an email, tell Boomerang to resurface it in your inbox if you don’t get a reply in a preset number of days.
Let’s say you plan to wait one week after sending pitches to follow up with bloggers who haven’t responded. Just set your email to boomerang in one week if you haven’t received a reply.
If the blogger doesn’t respond in 7 days, that email will boomerang back to your inbox. No need to fill up your calendar with reminders. Just follow up as the emails reappear in Gmail.
Make Your Post Look Good on any Blog
7. Firebug
Congratulations, your post has been accepted!
Now comes the tricky part: formatting your post for someone else’s blog.
Do they use h2 or h3 tags for subheaders? How wide can images be?
You can answer these questions by combing through the blog’s source code or make your life easier with Firebug.
Providing bloggers with a ready-to-publish post with HTML markup is a great way to ensure your post gets published quickly. Bloggers who accept posts in this format will love you.
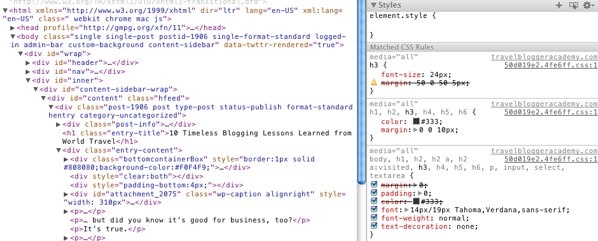
To make sure your post is customized for a specific blog, use Firebug to analyze the site’s HTML and CSS.

Analyze a site’s HTML and CSS with Firebug
First, install the Firebug extension for your browser. Then open an example post from the blog.
Right click on an item like a subheader and click ‘Inspect Element.’ Then you’ll see the HTML and CSS for the portion of the page in question.
You’ll need to play around with the interface a bit to find everything you’ll need. I commonly use it to find:
- Which header tags are used for subheaders, h2 or h3?
- How are images formatted? If full width, how wide can they be? If not, how are they aligned and framed?
- Does the blog use any other unique formatting like colors, captions, or photo attribution?
If you format your post to perfectly fit the blog, you’ll save the blogger time and show that you’re willing to go the extra mile. He/she will be grateful.
How do you think I got this post published? 🙂
Now it’s your turn.
Which apps do you use for writing and guest posting? Share your productivity hacks in the comments.
About the Author: Fred Perrotta is the co-founder of Tortuga Backpacks. After a 2009 backpacking trip to Eastern Europe, Fred and his co-founder Jeremy realized that most bags are made for hikers, not travelers. To save fellow travelers from the hassles they went through, Fred and Jeremy invented the ultimate travel backpack, The Tortuga. Check it out here.
Photo: Aaron Jacobs